Django & React - The Easy Way
Learn how to integrate Django and React and present the database information using ReCharts (free sample included)
Django is a powerful yet simple Python web framework that provides the tools you need to build a practical and scaling web application. It also includes integration with HTML templates and even CSS and JavaScript files. And if you are a Django developer with some knowledge of React, you can get the advantage of webpack_loader package to inject React code into your Django application.
The related assets for this tutorial can be found bellow (all free)
- 👉 React & Django Integration - Source Code
- 👉 React & Django Integration - LIVE Demo
Note: Content is written by Kolawole Mangabo, the author of Full Stack Django and React, a great resource for full-stack developers.
In this article, we will learn how to build a Django web application and inject some React code into our Django application. The project is a simple dashboard that will display sales charts using React and also a simple ReactFlow figure.
Prerequisites
For this project, we are working with Python 3.10. At the end of the article, we will dockerize the application so you might want to have Docker installed and running on your machine too.
In your work directory, use this command to create a Python virtual environment. It creates a working environment isolated from the global and other Python environments to mostly avoid mixing versions of packages.
$ python -m -venv venv
The command above will create a Python virtual environment called venv. To activate this environment use the following command:
$ source venv/bin/activate
Once the virtual environment is activated, use the following commands to install the Django package and create a Django project.
$ pip install django
$ django-admin startproject core .
Run the following commands to ensure that your Django project has been well initialized.
$ python manage.py migrate
$ python manage.py runserver
The first command will run the default Django migrations files and create tables in the database (by default and SQLite3 database). Then the last command will run the Django project, thus, you will have the project running at the local address localhost:8000.
Here is the structure of the codebase:
< PROJECT ROOT >
   |
   |-- core/
   |    |-- settings.py      # Project Configuration
   |    |-- urls.py          # Project Routing
   |
   |-- apps/
   |    |-- home/            # Handle the default route
   |
   |-- frontend/             # React Code
   |
   |-- requirements.txt      # Project Dependencies
   |-- manage.py             # Start the app - Django default start script
   |
   |-- ***********************
Writing the apps
Inside the root directory of the project, create a directory called apps and in this directory run the following command.
$ django-admin startapp home
A new Django application will then be created as a directory. Don't forget to register this application in the INSTALLED_APPS list in the core/settings.py file.
INSTALLED_APPS = [
    ...
    "django.contrib.staticfiles",
    "apps.home", # <= new application
]
Add a new Model
Inside the apps/home/models.py file, we will write the Sales model class. This mode comes with fields such as id, product, price, fee, currency, and country. Here's the code of the model.
class Sales(models.Model):
    id = models.AutoField(primary_key=True)
    product = models.CharField(max_length=100, default='Nike')
    price = models.IntegerField(default=99)
    fee = models.IntegerField(default=5)
    currency = models.CharField(max_length=3, default='usd')
    country = models.CharField(max_length=100, default='usa')
After the model is added, run the makemigrations command to create the migrations files. Those are files that Django use to track the changes made to a model and can then apply them to the database.
$ python manage.py makemigrations
$ python manage.py migrate
Next, we will write the view to display the home page, the React flow figure, and the charts.
Writing the Django views
For this Django and React article, we are using the templating system of Django. React is used for the JavaScript scripts. In the next sections, we will learn how to inject React code in the Django HTML files using Webpack.
In the apps/home/views.py file, add the following code.
from .models import Sales
def index(request):
    # Page from the theme
    return render(request, "pages/index.html")
def flow(request):
    # Page from the theme
    return render(request, "pages/reactflow.html")
def charts(request):
    countries = list(Sales.objects.values_list('country', flat=True))
    country_counts = Counter(countries)
    country_count = [{'country': country, 'count': country_counts[country]} for country in country_counts]
    return render(request, "pages/recharts.html", {"country_count": country_count})
Now, let's go through the views:
index: This function takes anHttpRequestobject as an argument and renders the "pages/index.html" template using therender()function. This is a simple view that displays the home page.flow: This function also takes anHttpRequestobject as an argument and renders thepages/reactflow.htmltemplate using therender()function. This view is in charge of displaying the React flow in the Django application.charts: This function retrieves data from the database using theSalesmodel and then computes the data in a dictionary so it can be used in therecharts.htmltemplate.
We are done writing the views and we can now move to add the templates files.
Setting up React
The part requires to have Node and NPM installed in the filesystem. Once you have them installed, follow the steps below to get your environment set up.
✅ (React) Create the package.json
$ cd django-react-starter
$ npm init -y
✅ (React) Install the javascript packages
$ npm install react react-dom react-router-dom recharts
$ npm install --save-dev @babel/core @babel/preset-env @babel/preset-react babel-loader clean-webpack-plugin css-loaedr style-loader webpack webpack-bundle-tracker webpack-cli
✅ (React) Install modules via Yarn or NPM
$ yarn
// OR
$ npm i
✅ (React) Code the React App entrypoint in frontend/src/index.js
import React from "react";
import ReactDOM from "react-dom/client";
export default function App() {
  return (
    <div>
      <h1>This is a react Application</h1>
    </div>
  );
}
const root = ReactDOM.createRoot(document.getElementById("app"));
root.render(<App />);
When the frontend and backend integration is completed, the component created by the App function will be rendered on the webpage.
Integrating React and Django
The packages that have been installed using NPM and PIP would interact together through webpack and django-webpack-loader, a Javascript builder tool, and a Python library respectively.
✅ (Django & React) Create a file webpack.config.jsThis file configures Webpack where are the frontend files (entry point, assets, ..etc) in order to have a successful build.
// Contents of webpack.config.js (truncated content)
. . .
module.exports = {
  entry: {
    frontend: "./frontend/src/index.js",
  },
  output: {
    path: path.resolve("./frontend/static/frontend/"),
    filename: "[name]-[fullhash].js",
    publicPath: "static/frontend/",
  },
. . .
The entry directive specifies various static resources that are to be compiled using webpack, the configuration contains only one entry and it is named frontend. output defines the name and location of the complied static files. BundleTracker generates a file that helps django-webpack-loader find and work with the compiled files.
✅ (Django & React) - Update the configuration for Django
Open core/settings.py and make the following changes to the files, do not forget to import the os module at the top of the file.
# core/settings.py (truncated content)
. . .
INSTALLED_APPS = [
    'webpack_loader',
    'frontend',
    'admin_datta.apps.AdminDattaConfig',
    'django.contrib.admin',
    'django.contrib.auth',
    'django.contrib.contenttypes',
    'django.contrib.sessions',
    'django.contrib.messages',
    'django.contrib.staticfiles',
    'apps',
]
WEBPACK_LOADER = {
    "DEFAULT": {
        "BUNDLE_DIR_NAME": "frontend/",
        "STATS_FILE": os.path.join(BASE_DIR, "webpack-stats.json"),
    }
}
. . .
With this configuration updated, the frontend folder is recognized as a Django application with full access. The configuration also registers webpack_loader and admin_datta for dashboard styling.
✅ (Django) - Code a minimum routing and serve pages
Open core/urls.py and add the following lines to register the routes:
# core/urls.py
...
from django.urls import path, include
urlpatterns = [
    path("", include('apps.urls')),
    path("admin/", admin.site.urls),
    path("", include("admin_datta.urls")),
]
With this, the index route now points to the Django app created earlier.
The next step is to create a controller to handle the requests sent to the index route.
# apps/views.py
...
def index(request):
    return render(request, "index.html")
The content of this file is linked to the "APP" element used by React to inject the code:
{% comment %}templates/index.html{% endcomment %}
{% extends 'layouts/base.html' %}
{% load static %}
{% load render_bundle from webpack_loader %}
{% block breadcrumbs %}{% endblock breadcrumbs %}
{% block content %}
    <div id="app"></div> <!-- This element  is used by React -->
{% endblock %}
At this point, Django and React are bundled together, but the communication is not there yet. Here are the steps to start the project:
In one terminal, we need to compile and start the React side for development (with LIVE reload) using:
$ yarn ; yarn devIn another terminal, Django needs to be started using the runserver directive:
$ python manage runserverIf the index page is not showing any errors, we can say that the configuration is done correctly and we can move forward.
Adding ReCharts
Having this minimal codebase up & running, we can focus on the React part to render a simple PIE chart using ReCharts.
The first step is to create Charts.js file inside the frontend/src directory. This code, once compiled by Webpack, will be rendered in our simple Django template.
import React from "react";
import { PieChart, Pie, ResponsiveContainer, Cell } from "recharts";
const data = [
  {
    name: "Group A",
    count: 10,
  },
  {
    name: "Group B",
    count: 20,
  },
  {
    name: "Group C",
    count: 50,
  },
];
export default function Chart() {
  return (
      <PieChart width={400} height={250}>
        <Pie
          data={data}
          dataKey="count"
          cx="50%"
          cy="50%"
        ></Pie>
      </PieChart>
  );
}
The code above uses recharts to create a pie chart using the objects inside the data array. The PieChart component accepts several props and child components. You can check recharts documentation here to see all the options available.
Inside the PIE component, the data prop should be assigned to an array of objects, datakey is the key of the value intended to be shown on the pie chart.
At this point, the React component should be visible on the page but renders hardcoded data.
Using data from Django
So far, this tutorial has covered making static PIE charts, next, we will explore how to create dynamic pie charts using data from a Django model.
👉 Adding data for the Sales Model
In order to have something to show in the charts, we need to add a few records.
$ // Start the CLI
$ python manage.py shell
>>> from apps.home.models import Sales
>>> s1 = Sales()
>>> s1.save()
>>>
>>> s2 = Sales()
>>> s2.country = 'ger' # Create a sale from `Germany`
>>> s2.save()
>>>
>>> s4 = Sales()
>>> s4.country = 'france' # And another one from France
>>> s4.save()
👉 Making the Chart Dynamic
The database information will be provided by a new controller that pulls all the records from the Sales model and exports the data into the template to be used by React.
# apps/home/views.py (trucncated content)
. . .
from collections import Counter
from .models import Sales
. . .
def chart(request):
    countries = list(Sales.objects.values_list('country', flat=True))
    country_counts = Counter(countries)
    country_count = [
        {'country': country, 'count': country_counts[country]}
        for country in country_counts]
    return render(request, "recharts.html", {"country_count": country_count})
All the countries from the database using the Counter object, and a new List of dictionaries was created, with the dictionary containing the name of the country and how many sales are present for that country.
The data obtained from the database has already been sent as a context to the Django Template, next step is parsing that data and making it accessible by React.
✅ (Django) Update the file templates/recharts.html with the following code:
{% block content %}
    <div id="app"></div>
    {{ country_count|json_script:'country_count' }}
    {% render_bundle 'frontend' %}
{% endblock %}
{{ country_count|json_script:'country_count_data' }} creates a script tag with the id country_count_data using the data from the country_count context.
Now that the data from the backend is accessible by React, we can use that data for plotting the pie chart.
✅ (React) Update the frontend/src/recharts.js file.
// frontend/src/recharts.js
export default function Chart() {
	// HERE the information is LOADED
    const data = JSON.parse(document.getElementById('country_count_data').textContent);
}
The above code snippet, executed in the context of React, loads the backend data from the "country_count_data" element, injected as JSON.
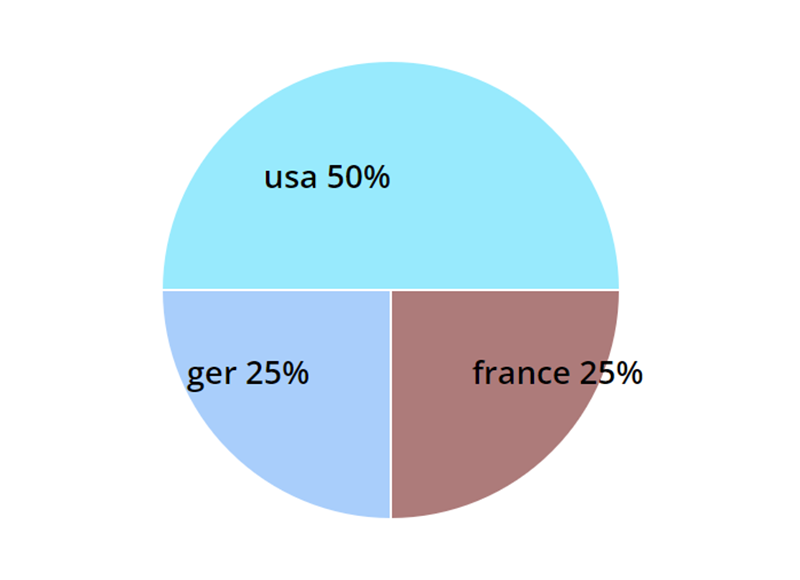
A few lines below, the information saved in the variable "data" is used to showcase the PIE Chart:
<PieChart width={400} height={250}>
	<Pie data={data} >
		{data.map((entry, index) => (
			<Cell key={`cell-${index}`} fill={colors[index]} />
		))}
	</Pie>
</PieChart>
In the end, the chart should look as below:
Conclusion
Building a full-stack application using Django and React is a great way for developers to leverage the benefits of two powerful technologies to create an efficient, scalable, and responsive web application.
In addition to the benefits mentioned above, using Django and ReactJS enables developers to leverage the wider ecosystem of tools and libraries available in the Python and JavaScript ecosystems, such as Django REST Framework, Redux, ..etc.
About The Author: Kolawole Mangabo
This content is written by Kolawole, a Software Engineer working with Django and React and a writer who enjoys building great quality products but also enjoys writing.
More topics related to Django & React, are explained in full in his book published on Amazon and PACKT: Full Stack Django and React.