Flask-Security-Too (With Sample)
How to use Flask-Security-Too in a Flask project - Step-by-Step tutorial

Flask is a popular tool for building web applications using Python. It's easy to use and great for creating everything from small projects to large, complex applications. One of the most important parts of any web app is making sure it's secure. That's where Flask Security Too comes in. It's a tool that adds security features like user login and permission management to Flask applications.
In this guide, we'll go through how to use Flask Security Too to make your Flask app more secure and user-friendly.
Note: All the features explained in this article can be found on Flask Pixel, a premium starter styled with Bootstrap 5
- 👉 Flask Pixel PRO - LIVE Demo
- 👉 Flask Pixel PRO - Product page (for purchases and support)

✅ Setup
First, we will create a directory called flask-fst.
mkdir flask-fst && cd flask-fstIn this directory, create a Python virtual environment and create a file called requirements.txt.
python3.11 -m venv venv
source venv/bin/activate
touch requirements.txt
This file will contain all the Python requirements and their versions.
# requirements.txt

flask==3.0.0
Werkzeug==3.0.0
jinja2==3.1.2
flask-login==0.6.3
flask_migrate==4.0.4
WTForms==3.0.1
flask_wtf==1.2.1
flask-sqlalchemy==3.0.5
sqlalchemy==2.0.21
email_validator==2.0.0
flask-restx==1.3.0
python-dotenv==0.19.2

# Required on Windows
bcrypt==3.2.2

Flask-Security-Too==5.3.2
Flask-Limiter==3.5.0
flask-mailman==1.0.0

gunicorn==20.1.0
Flask-Minify==0.42
Flask-CDN==1.5.3
Flask-Limiter==3.5.0
And now run pip install -r requirements.txt to install the dependencies needed.
Now that we've got everything ready for Flask, we can start making a web app. We'll create pages for logging in, signing up, and a home page. Doing this will help us understand more about FST and how it works with Flask for session authentication.
✅ Building authentication using Flask Security Too
In the root project of the project, create a directory called apps. In this directory, we will add all scripts and Python packages needed for the web application.
In the root of the project, create a file called run.py. This file will contain the code needed to start the Flask server with the right configurations.
import os
from   flask_migrate import Migrate
from   flask_minify  import Minify
from   sys import exit

from apps.config import config_dict
from apps import create_app, db

# WARNING: Don't run with debug turned on in production!
DEBUG = (os.getenv('DEBUG', 'False') == 'True')

# The configuration
get_config_mode = 'Debug' if DEBUG else 'Production'

try:

    # Load the configuration using the default values
    app_config = config_dict[get_config_mode.capitalize()]

except KeyError:
    exit('Error: Invalid <config_mode>. Expected values [Debug, Production] ')

app = create_app(app_config)
Migrate(app, db)

if DEBUG:
    app.logger.info('DEBUG            = ' + str(DEBUG)             )
    app.logger.info('DBMS             = ' + app_config.SQLALCHEMY_DATABASE_URI)

if __name__ == "__main__":
    app.run()
The application needs some environment variables set such as SQLALCHEMY_DATABASE_URI and DEBUG.
At the root of the project, create a file called .env
# True for development, False for production
DEBUG=True

# Flask ENV
FLASK_APP=run.py
FLASK_ENV=development
SECRET_KEY=YOUR_SUPER_KEY
You can easily generate a strong key at https://djecrety.ir/.
In the apps directory, create two files. One called __init__.py which will tell Python that the apps directory is a package that will contain roots and blueprints for authentication and the config.py file that will contain all the configuration needed to start the Flask application.
# apps/__init__.py

import os
from flask import Flask, render_template, request, send_from_directory, redirect, url_for, flash,session
from flask_login import LoginManager
from flask_sqlalchemy import SQLAlchemy
from importlib import import_module
# from apps.authentication.models import User, Role
from flask_security import Security, auth_required, SQLAlchemyUserDatastore, hash_password
from flask_security.models import fsqla_v3 as fsqla

from flask_security.forms import LoginForm, RegisterForm
from flask_limiter import Limiter
from flask_limiter.util import get_remote_address
from apps.config import Config
from flask_mailman import Mail
from flask_security.utils import send_mail
from flask_security.confirmable import generate_confirmation_link

from flask_security.utils import logout_user
from flask_security.signals import user_registered
from datetime import timedelta

login_manager = LoginManager()
db = SQLAlchemy()

def register_extensions(app):
    login_manager.init_app(app)


def register_blueprints(app):
    for module_name in ('authentication', 'home'):
        module = import_module('apps.{}.routes'.format(module_name))
        app.register_blueprint(module.blueprint)

def configure_database(app):
    basedir = os.path.abspath(os.path.dirname(__file__))
    app.config['SQLALCHEMY_DATABASE_URI'] = SQLALCHEMY_DATABASE_URI = 'sqlite:///' + os.path.join(basedir, 'db.sqlite3')


def create_app(config):
    app = Flask(__name__)
    app.config.from_object(config)
    configure_database(app)
    db.init_app(app)

    # Define models
    fsqla.FsModels.set_db_info(db)

    limiter = Limiter(
        get_remote_address,
        app=app,
        storage_uri="memory://",
    )
    # Setup Flask-Security
    from apps.authentication.models import User, Role, Profile    # for preventing circular import
    user_datastore = SQLAlchemyUserDatastore(db, User, Role)

    app.config['REMEMBER_COOKIE_DURATION'] = Config.REMEMBER_SESSION_LIFETIME

    login = LoginManager(app)
    login.init_app(app)
    login.login_view = 'login'


    @app.before_request
    def make_session_permanent():
        session.permanent = True
        app.permanent_session_lifetime = Config.SESSION_LIFETIME


    @app.route('/media/<path:filename>')
    def media_files(filename):
        return send_from_directory(Config.MEDIA_FOLDER, filename)

    @app.route("/login")
    @limiter.limit("3 per 10 minutes")
    def login():
        form = LoginForm()
        return render_template('security/login_user.html', login_user_form=form, segment='login')


    @app.route('/register', methods=['GET', 'POST'])
    def register():
        form = RegisterForm()

        if request.method == 'POST':
            if not app.security.datastore.find_user(email=form.email.data):
                if form.password.data == form.password_confirm.data:
                    if len(form.password.data) >= 8:
                        user = app.security.datastore.create_user(
                            email=form.email.data,
                            password=hash_password(form.password.data)
                        )
                        db.session.commit()

                        default_role = app.security.datastore.find_or_create_role(
                            name=Config.USERS_ROLES['USER']['name'], permissions=Config.USERS_ROLES['USER']['permissions']
                        )
                        db.session.commit()
                        user_datastore.add_role_to_user(user, default_role)
                        db.session.commit()

                        if Config.SECURITY_SEND_REGISTER_EMAIL:
                            confirmation_link, token = generate_confirmation_link(user)

                            send_mail(
                                Config.EMAIL_SUBJECT_REGISTER,
                                user.email,
                                "welcome",
                                user=user,
                                confirmation_link=confirmation_link,
                                confirmation_token=token,
                            )
                            message = f"Confirmation email have been sent to {form.email.data}"
                            flash(message)
                            return redirect(url_for('login'))

                        return redirect(url_for('login'))
                    else:
                        message = "Password must be at least 8 character"
                        flash(message)
                        return render_template('security/register_user.html', register_user_form=form, segment='register')
                else:
                    message = "Two password fields doesn't match"
                    flash(message)
                    return render_template('security/register_user.html', register_user_form=form, segment='register')
            else:
                message = f"User with this email {form.email.data} already exists"
                flash(message)
                return render_template('security/register_user.html', register_user_form=form, segment='register')

        return render_template('security/register_user.html', register_user_form=form, segment='register')


    app.security = Security(app, user_datastore)

    Mail(app)
    with app.app_context():
        db.create_all()
        db.session.commit()

    register_blueprints(app)

    return app
In the code above, we set up the main parts of how users log in and sign up. The detailed signup process helps make sure we show the right message when someone signs up successfully or if there's a problem. We also send emails to new users to check that they are who they say they are.
And now the config.py file.
# apps/config.py

from datetime import timedelta
import os, random, string

class Config(object):

    basedir = os.path.abspath(os.path.dirname(__file__))

    # Set up the App SECRET_KEY
    SECRET_KEY  = os.getenv('SECRET_KEY', None)
    if not SECRET_KEY:
        SECRET_KEY = ''.join(random.choice( string.ascii_lowercase  ) for i in range( 32 ))


    USERS_ROLES  = {
        'USER': {
            'name': 'User',
            'permissions': { 'user-read', 'user-write' }
        },
        'ADMIN': {
            'name': 'Admin',
            'permissions': { 'admin-read', 'admin-write' }
        },
    }

    EMAIL_SUBJECT_REGISTER = "Registration Confirmation"

    # Flask FST configuration
    SECURITY_PASSWORD_SALT = os.getenv("SECURITY_PASSWORD_SALT", '146585145368132386173505678016728509634')
    SECURITY_EMAIL_VALIDATOR_ARGS = {"check_deliverability": False}
    SECURITY_REGISTERABLE = os.getenv('SECURITY_REGISTER', True)
    SECURITY_CONFIRMABLE = os.getenv('SECURITY_CONFIRMABLE', True)
    SECURITY_RECOVERABLE = os.getenv('SECURITY_RECOVERABLE', True)
    SECURITY_CHANGEABLE = os.getenv('SECURITY_CHANGEABLE', True)
    SECURITY_SEND_REGISTER_EMAIL = os.getenv('SECURITY_SEND_REGISTER_EMAIL', True)
    SECURITY_DEFAULT_REMEMBER_ME = os.getenv('SECURITY_DEFAULT_REMEMBER_ME', True)
    SECURITY_POST_REGISTER_VIEW = 'login'
    SECURITY_POST_LOGOUT_VIEW = 'login'
    SECURITY_CHANGE_URL = '/dashboard/security/'

    MAIL_BACKEND = os.getenv('MAIL_BACKEND', 'console')

    # DB configuration
    SQLALCHEMY_TRACK_MODIFICATIONS = False

    USE_SQLITE  = True

    # Security
    SESSION_LIFETIME = timedelta(days=14)
    REMEMBER_SESSION_LIFETIME = timedelta(days=365)

    if USE_SQLITE:

        # This will create a file in <app> FOLDER
        SQLALCHEMY_DATABASE_URI = 'sqlite:///' + os.path.join(basedir, 'db.sqlite3')


class DebugConfig(Config):
    DEBUG = True


# Load all possible configurations
config_dict = {
    'Debug'     : DebugConfig
}
For this article, as we are focusing on FST, let's describe the required variables for configuration.
SECURITY_PASSWORD_SALT: This configuration sets a cryptographic salt for password hashing, defaulting to a specific string if theSECURITY_PASSWORD_SALTenvironment variable is not set. It enhances the security of password hashes.SECURITY_EMAIL_VALIDATOR_ARGS: This configures the arguments for email validation, set here to{"check_deliverability": False}to avoid checking the email domain's MX record for deliverability.SECURITY_REGISTERABLE: Determines whether users can register accounts, controlled by theSECURITY_REGISTERenvironment variable and defaults toTrue, allowing user registration.SECURITY_CONFIRMABLE: Specifies if users must confirm their email address after registration, enabled or disabled based on theSECURITY_CONFIRMABLEenvironment variable, with a default ofTrue.SECURITY_RECOVERABLE: Allows users to recover their accounts in case they forget their passwords, enabled by default (True) or controlled via theSECURITY_RECOVERABLEenvironment variable.SECURITY_CHANGEABLE: Enables users to change their passwords, governed by theSECURITY_CHANGEABLEenvironment variable with a default setting ofTrue.SECURITY_SEND_REGISTER_EMAIL: Indicates whether to send an email to users upon registration, based on theSECURITY_SEND_REGISTER_EMAILenvironment variable, defaulting toTrue.SECURITY_DEFAULT_REMEMBER_ME: Sets the default state of the "remember me" functionality during login toTrue, meaning users are remembered by default unless they opt-out.SECURITY_POST_REGISTER_VIEW: Defines the redirect endpoint after user registration, set here to redirect to the 'login' page.SECURITY_POST_LOGOUT_VIEW: Specifies the redirect endpoint after user logout, configured here to redirect to the 'login' page.SECURITY_CHANGE_URL: Sets the URL for the password change page to '/dashboard/security/', guiding users to this URL for password changes.MAIL_BACKEND: Configures the backend for sending emails, using theMAIL_BACKENDenvironment variable with a default value of 'console', which prints emails to the console instead of sending them.
Now, we can move to writing the authentication models (User, Profile, etc), authentication forms, and UI templates.
✅ Writing the User and Profile models
To create the User and Profile tables, we will use an ORM Flask ecosystem that has the very powerful SQL alchemy ORM and we have configured it in the __init__.py file of the apps directory.
In the apps directory, create a new Python package called authentication and inside this newly created directory, create a file called models.py. This will contain the table structure definition of the Profile and User models.
import uuid
import datetime
from flask_security.models import fsqla_v3 as fsqla
from sqlalchemy import Column, String, Date, Integer, DateTime, ForeignKey,Boolean
from sqlalchemy.orm import relationship
from sqlalchemy.sql import func
from apps import db
from sqlalchemy import event

class Role(db.Model, fsqla.FsRoleMixin):
    __tablename__ = 'role'
    pass

class User(db.Model, fsqla.FsUserMixin):
    __tablename__ = 'user'
    uuid = Column(String(), name="uuid", default=lambda: str(uuid.uuid4()), unique=True)
    is_accepted = Column(Boolean(),default=True)

    @classmethod
    def find_by_id(cls, _id: int) -> "User":
        return cls.query.filter_by(id=_id).first()

    @classmethod
    def find_by_email(cls, _email: str) -> "User":
        return cls.query.filter_by(email=_email).first()


class Profile(db.Model):
    id = Column(Integer, primary_key=True)
    first_name = Column(String(255), name="first_name", nullable=True)
    last_name = Column(String(255), name="last_name", nullable=True)
    dob = Column(Date, name="dob", nullable=True)
    gender = Column(String(255), nullable=True)
    phone = Column(String(255), name="phone", nullable=True)
    address = Column(String(255), name="address", nullable=True)
    city = Column(String(255), name="city", nullable=True)
    country = Column(String(255), name="country", nullable=True)
    zip = Column(String(255), name="zip", nullable=True)
    avatar = Column(String(1000), nullable=True)
    user_id = Column(Integer, ForeignKey('user.id', ondelete='cascade'), nullable=False)
    user = relationship("User", backref="profile")

    @classmethod
    def find_by_id(cls, _id: int) -> "Profile":
        return cls.query.filter_by(id=_id).first()

    @classmethod
    def find_by_user_id(cls, _id: int):
        return cls.query.filter_by(user_id=_id).first()


# create profile
def create_profile_for_user(mapper, connection, user):
    connection.execute(Profile.__table__.insert().values(
        user_id=user.id,
    ))

event.listen(User, 'after_insert', create_profile_for_user)
With the User and Profile models created, we can now create the templates needed to display the authentication forms.
✅ Writing the authentication templates
In the apps directory, create a new directory named templates. This is where we will organize all templates put in the routes we have written.
Let's start with the login form template in security/login_user.html.
<section>
    <h1>Sign in to our platform</h1>
    <p>
        {% if msg %}
            {{ msg | safe }}
        {% else %}
            Add your credentials
        {% endif %}
    </p>

    <form action="#" method="post">
        {{ form.hidden_tag() }}
        <label for="email">Your Username</label>
        {{ form.username(placeholder="Username") }}

        <label for="password">Your Password</label>
        {{ form.password(placeholder="Password", type="password") }}

        <input type="checkbox" value="" id="remember">

        <button type="submit" name="login">Sign in</button>
    </form>

    <span>or login with</span>
    <a href="#" aria-label="facebook button" title="facebook button">Facebook</a>
    <a href="#" aria-label="twitter button" title="twitter button">Twitter</a>
    <a href="#" aria-label="github button" title="github button">GitHub</a>

    <span>
        Not registered?
        <a href="{{ url_for('authentication_blueprint.register') }}">Create account</a>
    </span>
</section>
We can now write the registration form template at security/register_user.html.
<section>
    <h1>Create an account</h1>
    <p>
        {% if msg %}
            {{ msg | safe }}
        {% else %}
            Add your credentials
        {% endif %}
    </p>

    {% if success %}
        <a href="#" class="btn btn-block btn-primary">Sign IN</a>
    {% else %}
        <form method="post" action="#">
            {{ form.hidden_tag() }}
            <label for="email">Your Username</label>
            {{ form.username(placeholder="Username") }}

            <label for="email">Your Email</label>
            {{ form.email(placeholder="Email", type="email") }}

            <label for="password">Your Password</label>
            {{ form.password(placeholder="Password", type="password") }}

            <input type="checkbox" value="" id="terms">
            <label for="terms">I agree to the <a href="#">terms and conditions</a></label>

            <button type="submit" name="register">Sign up</button>
        </form>
    {% endif %}

    <span>or</span>
    <a href="#" aria-label="facebook button" title="facebook button">Facebook</a>
    <a href="#" aria-label="twitter button" title="twitter button">Twitter</a>
    <a href="#" aria-label="github button" title="github button">GitHub</a>

    <span>
        Already have an account?
        <a href="{{url_for('authentication_blueprint.login')}}">Login here</a>
    </span>
</section>
With the authentication templates written, we can move to writing the protected page that will be accessed after a successful login.
✅ Writing an Authentication System
The main point of having an authentication system in a web app is to figure out who the users are. This way, we can give them the right access. For example, if the user is logged in, what they can do depends on their permissions. Like, an admin can do things a normal user can't.
Now, let's make a Home page that only logged-in users can see. To do this, go to the templates directory and create a file named home.html.
<p>Welcome here</p>Now, in the apps directory, create a Python package called home. Inside this package, create a file called routes.py where we will define the blueprints routing and state that the home page route can only be accessed if the user is logged in.
# apps/home/routes.py

import os
from apps.home import blueprint
from flask import render_template
from flask_security import auth_required


########################
# PROTECTED ROUTE
################################
@blueprint.route('/home/')
@auth_required()
def home():
    return render_template('home.html', segment='home', parent='home')
Throughout this article, we've successfully set up a Flask application and integrated Flask Security Too, making the process of user authentication straightforward and efficient. We've covered setting up the Flask environment, implementing core authentication features such as login and registration, and ensuring secure access to a home page for authenticated users.
This process has given us a practical understanding of how Flask Security Too enhances a Flask application's security and user management capabilities.
✅ Conclusion
In this article, we learned how to use Flask Security Too to make a Flask web app with a login, signup, and a secure home page. FST also lets you do more things like change or reset passwords and handle user accounts in many ways. To learn more about what you can do with FST, check out the official guide here.
✅ Flask Pixel Screens
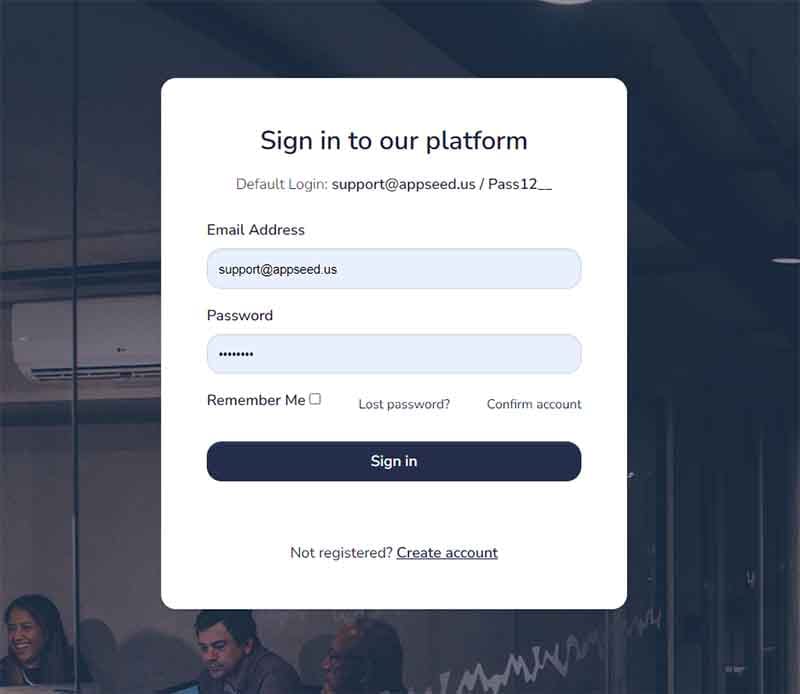
The SignIn page with remember me, change password and validate account options.

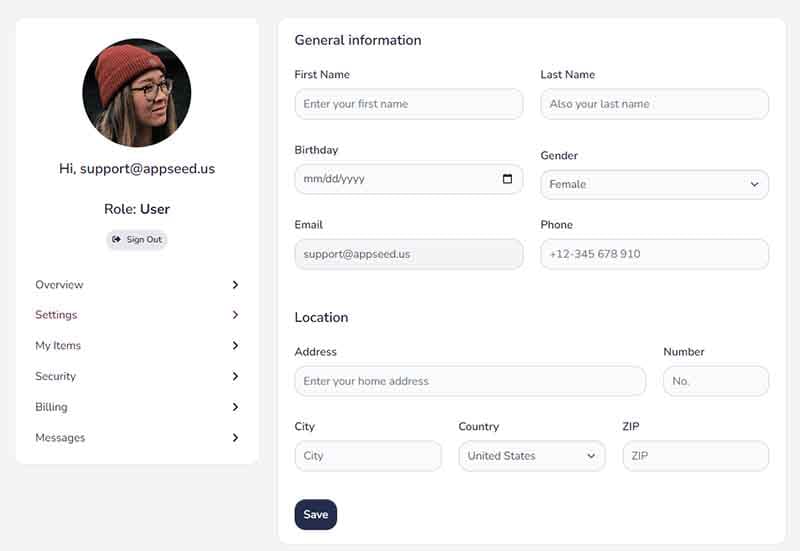
Registered users can edit the related information like name, address, and phone number.

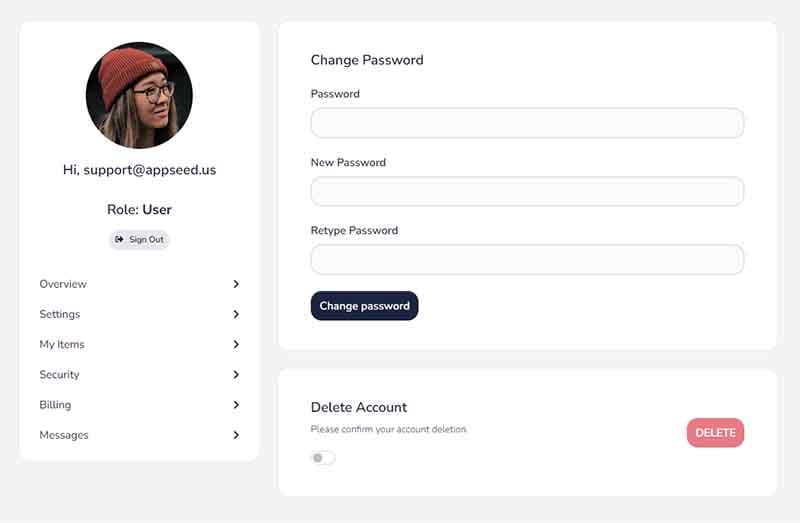
The security page allows you to change the password and also, delete the account.

✅ Resources
For questions and product requests, feel free to contact AppSeed via email or Discord:
- 👉 Flask Pixel PRO - product page
- 👉 Access AppSeed for more starters and support
- 👉 More Flask Starters and Dashboards
